
array map物件
從這章開始我們會稍微進階到物件的概念,也會比較貼近我們實際開發上在使用的情況。
先複習我們上一章學到的Array部分,若我們有一個array如下:
xxxxxxxxxx $test = array(20,58,37,45,86,64,72,55,92,88);echo $test[0];//20echo $test[3];//45我們把一堆數字放到一個array裡面,沒有指定他們的”位置”,但是他們預設就有自己對應的”座號”,例如第一個echo 就是列出座號是0的數字(也就是20),但這個位置在需要時是可以由我們指定的,這就是map的概念,例如:
xxxxxxxxxx $test = array();$test[2] = 37;$test[5] = 88; print_r($test);最後我們印出$test這個陣列時結果會看到如下:
Array( [2] => 37 [5] => 88)
我們就可以指定我們要儲存的位置放入數字,可以在做一些需要順序的功能時使用,當然光這樣離我們實際上常用的用法還有段距離,所以我們接下來要將array map 正式帶入物件的概念。
假設我們要儲存一個user的資料在記憶體中,我們假設單一個user有的資料有帳號(account),密碼(password),e-mail(email)三個資訊,則我們在程式中可以用以下方式模擬:
xxxxxxxxxx $user = array();$user["account"] = "test";$user["password"] = "test123";$user["email"] = "test123@gmail.com";print_r($user);宣告完成後我們透過最下面的print_r就可以看到我們的user結構如下:
Array
(
[account] => test
[password] => test123
[email] => test123@gmail.com
)
xxxxxxxxxx $user = array();$user["account"] = "test";$user["password"] = "test123";$user["email"] = "test123@gmail.com";print_r($user);建立完成後我們使用上就很方便了,如果我們要確認user輸入的密碼正不正確,只要把使用者的輸入跟我們伺服器內儲存的$user[“password”]比對就知道使用者的密碼正不正確了。
課後自我練習
1.我們假設使用者輸入的帳號跟密碼分別是$account跟$password,$user這個array有我們剛剛輸入的資料
Array
(
[account] => test
[password] => test123
[email] => test123@gmail.com
)
xxxxxxxxxx function test($account,$password,$user){ if(填入條件){ //回傳登入成功 return true; } else{ //回傳登入失敗 return false; }}if中的條件你覺得該如何填入呢?
2.模擬一筆訂單可能會有的資料,並用array map的方式宣告出來。
多維度array map
二維的array map比較貼近實際開發常用到的情況,至於甚麼是二維呢?其實跟我們數學的點線面是類似的概念,上面所提到的例子,”一位”使用者的資料就是一個一維陣列,等同於我們數學中的線。

但假設我們要儲存多個使用者的資料,靠同一個Array肯定是不好紀錄的,所以就衍伸成二維陣列,也就是長成類似這樣。
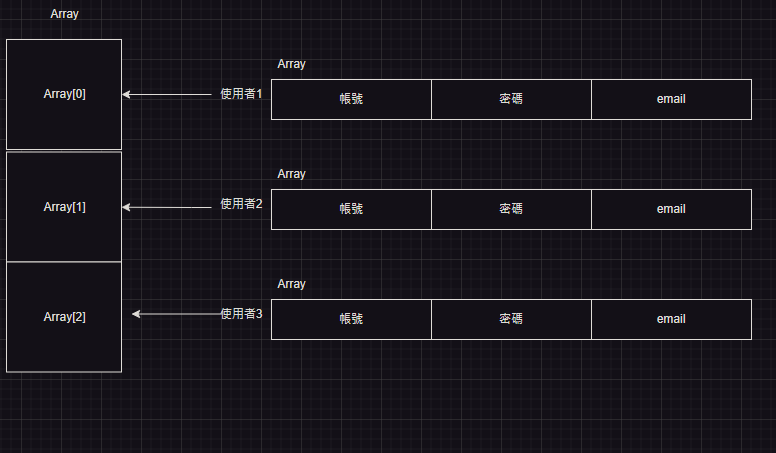
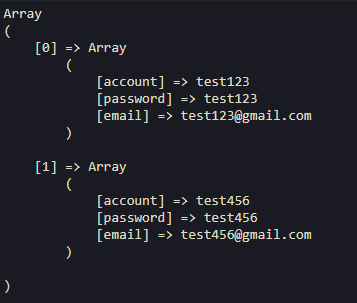
xxxxxxxxxx $users = array();//存放所有user資料的陣列$user1 = array();$user1["account"] = "test123";$user1["password"] = "test123";$user1["email"] = "test123@gmail.com";//給予user1資料$user2 = array();$user2["account"] = "test456";$user2["password"] = "test456";$user2["email"] = "test456@gmail.com";//給予user2資料$users[] = $user1;$users[] = $user2;print_r($users);我們記錄所有user資訊的陣列users就會長成
在透過前幾章學到的foreach就可以針對每個user的資料統一做處理囉!